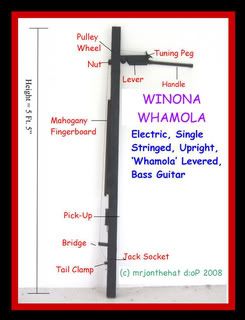
I saw Les Claypool play one with his Flying Frog Brigade :
I found the parts and built one myself following NAPOLEON XV's guidelines on youtube :
"Parts list: - Slab of oak / Steel shaft -- 5' to 6'x1"x1" / P-bass pickup (or whatever bass pickup makes you happy) / Output jack / 22 gauge wire / Bass tuning machine / Round, slim, threaded shaft (or bolt) with nuts / Screen door roller / Brass Wood screws (usually come with the brackets) / Support brackets / Finger board wood - 1"x ?" x 3' (in the video, I use 1"x1"x3' but I think one with less depth would work better).
Instructions: - 1) Cut the slab of oak to about 10". 2) Use a hand saw to put grooves for tuning machine, then chip out the wood as best as you can - (a router would do so much better of a job so borrow one if you can.). 3) Drill a hole the proper size for the tuning machine. 4) Screw the brackets into the handle and try to make them as even as possible. 5) Use a hacksaw and put a slit in the top of the steel shaft 1" down and ¾" wide - (make sure your roller fits). 6) Drill a hole through the shaft as straight as possible - (use a drill press if you have access to one) for the slim, threaded shaft (bolt) to fit through. 7) Make the bridge out of the excess oak from the handle - (use a triangle shape). It only needs to clear the pickups and fingerboard. 8) Apply glue to the fingerboard (after seeing the expansion of the gorilla glue, I advise you to try TiteBond II, as gorilla glue may throw off measurements). 9) Apply glue to the steel shaft. - (Put something between the clamps and the fingerboard, to keep it from indenting.) 10) Make a triangle of wood similar to bridge, and glue it to the fingerboard as the 'nut'. 11) Place the pickup near the bridge, (the magnets should hold it to the shaft), use a sharpie to mark the spots where holes need to be drilled. Drill the holes, then use metal screws rather then the pickup's screws, to secure it. 12) Use the hacksaw to open up a spot in the bottom of the shaft for the jack, use a method where you make the first 2 like this ___ then the next one like this / ...then use a pair of pliers and bend them so that they can be sawn. 13) Drill a hole big enough for the jack on the other side. Drill a hole at about a 45 degree angle in the bridge all the way through the first wall of the shaft. Tin your leads on to your pickup, solder some extensions and wrap them with electrical tape, feed the wires through and solder them right to the jack, (no pots!!). 14) Put the handle in the appropriate position, and feed the slim shaft (bolt) through, making sure to get the brass roller in the middle, then have some one help you hold up the string to the whamola and mark out a spot as close to the bridge as you can get without having to cut the string. 15) Drill a hole all the way through and feed the string through, string it up and have fun!" (NAPOLEONXV)
All I would add to that is this - I made my whamola out of a steel tube that had to be cut with a hacksaw and drilled with a power drill, using metalworking drill bits. A bench mounted drill is far safer than the method I used ! I'd also advise using metal for everything except the fingerboard, nut and bridge. By bolting the sections together, I was able to reposition them after my initial tests. I placed the lever further up the whamola body to bring it closer to the pulley wheel and it allows the lever to work under less strain. - ALWAYS CHECK YOUR WIRING WITH A TESTER TO AVOID ELECTRICAL SHOCK !! - Make sure the string / body / jack isn't live - and don't be afraid to experiment...there are no set dimensions or rules with this instrument. I have now added a tapered mahogany fingerboard (like you'd find on an upright bass), and am using a cheap 'D' string from a double bass, which has improved the tone and sustain - when it breaks, I may switch to an 'A' string...(mrjonthehat d:oD )
My Pics are here :
...and here's me trying it out for the first time...
1 comment:
I was looking for this information, thanks for put in this easy way, I mean in a easy way to understand it jajaja, well until the next time.
Post a Comment